
The December 2009 Daring Bakers’ challenge was brought to you by Anna of Very Small Anna and Y of Lemonpi. They chose to challenge Daring Bakers’ everywhere to bake and assemble a gingerbread house from scratch. They chose recipes from Good Housekeeping and from The Great Scandinavian Baking Book as the challenge recipes.
I love Christmas, it's my favourite time of year! Aside from what it symbolises, I'm not sure if it's the beautiful lights and decorations or looking forward to Christmas lunch with family & friends, whatever it is, I enjoy it so much that I start early. In fact, I put the tree and decorations up on the week of my birthday, Nov 17, as part of my b'day festivities. A little strange, but if you know me.... ;)

The day that the December DB challenge was to be announced, I said to my husband, "If I were hosting a December challenge, I'd make it a gingerbread house." And lo and behold, when the challenge was published, we were to make a gingerbread house!

Ready to be baked
We were given two recipes to choose from, I chose the second, a Scandinavian recipe that looked similar to an all-spice cookie recipe that I like to use to do a nativity scene. I was, however, a little curious at the amounts of spices in the recipe, it seemed a little too much, I mean, 3tsp of ground cloves is a lot! So I did a little Googling, as I tend to do, and came across an explaination for the amount of spices. The creator of this recipe, Beatrice Ojakangas, made it this way, not so much for eating, but to have a lovely Christmassy smell in the house. That made sense!

Cutting out the shapes from the template
But as people started to try the recipe out, there were comments about it not tasting like gingerbread and being too spicey and not sweet enough. I wasn't bothered about it not tasting like gingerbread, but I did want it to be pleasant to eat, so I decided to cut the cloves down to 2tsp. When I tasted some of the offcuts, it was still quite spicey but I thought it was lovely, as I said, very similar to an all-spice recipe I make. It also still had the desired effect of having a lovely fragrance in the house, you get wafts of the lovely smell now and then, fantastic! I also changed the sugar a bit, using 1 cup dark brown sugar to give it a lovely rich flavour and adding extra granulated brown sugar to up the sweetness.

The concept drawings and a paper model
We were allowed to use any template we liked to make the house and so I decided to try make my own, and if I do say so myself, I think I was rather successful! I specifically wanted a bay window so that I could put a gingerbread Christmas tree inside, like you'd see when you drive around Ireland, most of the houses put their lovely lit up trees in the window so that everyone can enjoy it, I'm sure this is the case in many countries.

Busy assembling
I did end up breaking 2 of the side pieces of the bay window as they're quite delicate once the windows are cut out, but thankfully the recipe made enough dough to make extras of those sort of fragile pieces. I learnt that it's best to cut out the windows just as the dough is out the oven, while it's still a little soft. Better yet, to take the pieces out early, cut out windows and shapes, then return to the oven to finish baking and harden up.

Cutting out windows while still soft

Inside the house
I'd also seen lovely stained glass toffee on Nana Glen Mum's site a little while before when looking at a previous DB challenge and decided I had to use this to make the windows. I'd planned to put battery LED lights inside the house to light up the windows, and with the colourful stained glass, it was just beautiful!

Sides of the house with colourful windows
We were told we could decorate our houses any way we liked, so long as everything was edible. No problem there! I'd bought a whole variety of sweets to use but ended up using only Smarties, Tic Tacs & pretzels (and a little edible glitter, dragees and lustre spray). Even using just those few things to decorate, I got the look I wanted and was so happy with the end result, I was running around like an excited kid going, "Look at my awesome house!!!!" (modest eh? ;) )
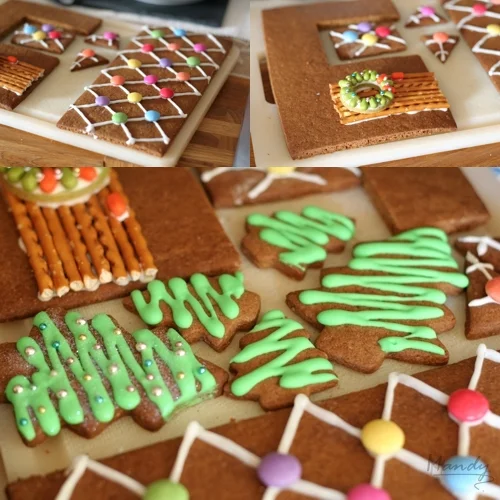
Decorating before assembly
The week I'd decided to make my house, I'd also decided to make a whole bunch of Christmas themed macarons as Christmas hampers, so the house only got put together a little bit at a time, also due to the lack of daylight hours for photos, but I think it was probably a good thing. I decorated the pieces while unassembled, then left them overnight, this gave the royal icing plenty of time to dry nicely. I then put the walls together, again, left it overnight while there was no more light or time in the day, this again helped because the icing set hard before getting the roof on. You can definitely put this together in a day or two, but if you're a little short on big chunks of time in this busy month, you can definitely put it together bit by bit.

Roof sprayed with edible pearl lustre spray

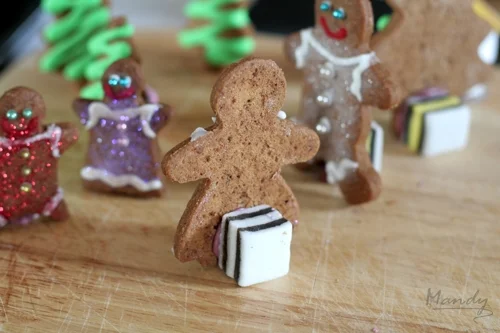
Happy gingerbread family decorated with edible glitter
All in all, I loved this challenge. It's not your usual gingerbread but I love the flavour and it really does give off a lovely Christmassy fragrance. Making it also adds to the anticipation and excitement of Christmas, and if you have kids, it's great to make with them too!

Italic text are things I've edited or added, to see the original recipe, you can see it at the Daring Kitchen
Ingredients
1 cup (225g) Butter, room temperature
1 cup (200g) Dark Brown Sugar
½ cup (100g) Golden Brown Sugar
2 Tbsp Cinnamon
4 tsp Ground Ginger
1½-2 tsp Ground Cloves
2 tsp Baking Soda
½ cup Boiling Water
5 cups (625g) All-Purpose Flour
Method
- In a large bowl, cream the butter and sugar until blended.
- Mix the cinnamon, ginger and cloves with the flour
- Mix the baking soda with the boiling water and add to the dough along with the flour.
- Knead to make a stiff dough. If necessary add more water, a tablespoon at a time.
- Chill 2 hours or overnight.
- Tip: If chilling overnight, the dough will be too hard to roll out straight away, allow it to sit out for a few hours before rolling out
- Cut patterns for the house, making patterns for the roof, walls, chimney and bay window with roof out of parchment paper.
- Roll the dough out on a large, ungreased baking sheet and place the patterns on the dough.
- Cut out the various pieces with a knife, or trees and people with cookie cutters, but leave the pieces in place.
- Tip: I rolled the dough thicker for the walls and bay window so they are structurally stronger, and thinner for the roof, trees and gingerbread people
- Carefully take away the dough from between the shapes and set aside scraps
- Combine scraps and roll out again as above to do other pieces
- Tip: For more delicate peices, there's enough dough to make extras in case you break any
- Preheat the oven to 375 °F / 190 °C (170 ° Fan Assisted).
- Bake for 12 to 15 minutes until the cookie dough feels firm.
- After baking, again place the pattern on top of the gingerbread and trim the shapes, cutting the edges with a straight-edged knife. Leave to cool on the baking sheet.
- Tip: I find it best to take the sheet out of the oven a few minutes before it's finished baking, cut out windows or patterns and trim the edges while the dough is still soft, then return it to the oven to finish baking
- Decorate the pieces while unassembled so that the sweets and royal icing doesn't run down or drip
- Tip: I use ready mix royal icing as it's easiest to get the right consistency as all you do is add more water or more of the icing mix. For assembling, I mix the icing a little thicker, it's more sticky, won't run and drip and will dry quicker when putting the house together. For decorating, I make it thinner with more water so that it flows and pipes easier for more delicate detail
- Allow royal icing and decorations to set before assembling
- Assemble the house, walls first, bay window, roof & chimney
- Tip: I put the walls up and let the icing dry with glasses or mugs keeping the walls supported before putting the roof on
- Assemble the bay window, allow to set, then stick onto the house.
- If putting a tree inside the window, put it in now
- Tip: I attached a square Liquorice Allsort to the back of the tree with royal icing to help it stand. Put a little royal icing on the under side of the tree trunk and Allsort and stick it to the board
- Stick the bay window roof on.
- Finally put the roof and chimney on
- Tip: Help prop the roof up with a glass or spice bottle, anything the right height to support the roof in place while the icing dries
Sticking on liquorice allsorts to help them stand
To make your own royal icing:
Ingredients
1 large Egg White
2 cups Powdered Sugar
1 tsp White Vinegar
- Beat all ingredients until smooth, adding the powdered sugar gradually to get the desired consistency.
- Pipe on pieces and allow to dry slightly before assembling.
- If you aren't using it all at once you can keep it in a small bowl, loosely covered with a damp towel for a few hours until ready to use.
- You may have to beat it slightly to get it an even consistency if the top sets up a bit.
- Piped on the house, this will set up hard over time.

Thanks to our hostesses this month for a fantastic challenge!
If you would like to use the template I made, you can download the pdf file from this link: MandyM's Gingerbread House Template
Print the template then trace the shapes onto the back of parchment paper (2x roof, 2x side, 2x front/back, chimney, bay window)
Other Tips
If you're planning on putting lights in your house, I'd recommend using LED ones as they don't give off any heat
Cut a small bottom corner off the back wall so that the wire can go through
Remember to lay the lights on the board before sticking the back wall down! (You'd be surprised how easy this is to forget, lol ;) ) so that you're not trying to shove the lights through the hole
Any gaps can easily be filled up with thick royal icing
I used round pastry cutters to get the rounded tops of the windows, then cut the rest of the window out with a knife